The Profile content type is generally used for providing information to get to know an individual better or to provide contact information. This can include student, staff, faculty, or individual profiles of importance, like departments or offices. Sorting order for Profiles is as follows: Content Order, Last Name, First Name, Title.
- Log in to the site as an editor or user with the appropriate permissions.
- Click on the Content link in the admin menu or toolbar.
- Manage » Content
- Click on the Add content button
- From the list of content types, select Profile
- Enter a title for the profile in the Title field
- Fill in the other fields as desired.
- View descriptions of all available fields below.
- When you are finished, click the Save button to save the profile.
If a title is left blank, the First Name and Last Name fields will be used to create a title. First name and last name fields are not displayed on the Profile page and only used for sorting purposes.
- Title (optional) - Text entered will be used as the title of the content, included in the breadcrumbs, and become the content's URL unless otherwise configured. If left blank, First Name and Last Name will be used to create a title.
- First Name (optional) - Ability to designate the first name. Used for sorting purposes
- Last Name (optional) - Ability to designate the last name. Used for sorting purposes
- Pronouns (optional) - Ability to designate what pronouns the individual uses.
- Profile Picture (optional) - Provide a representative picture of the individual.
Note: At least one field must be filled out in this section for the Profile to show up in the Staff Profile views.
- Add more specific information about the individual.
- Generally used for Staff Member contact information.
- Fields available are:
- Department / Unit
- Position Title
- Office Location
- Email Address
- Phone Number
Note: At least one field must be filled out in this section for the Profile to show up in Student Profile views
- Add more specific information about the individual.
- Generally used to highlight Student Staff information
- Fields available are:
- Class of
- Hometown
- Major(s)
Add content to the article with paragraph types - pre-designed modular content, allowing each section to be unique and easy to create.
- Click on Add Paragraph
- Select the paragraph to use from the paragraph browser
- Paragraphs can be filtered by section or searched using the search box
- Continue this process until all desired paragraphs have been created
- Make Views Linkable to Content - Ability to choose if the content views link to the content or another resource.
- External Link / URL - Ability to add a link to an external resource rather than the Article content type
- Short Title - Alternate title to be used for views, site breadcrumbs, and search engine results. Should be 70 characters or less.
- Thumbnail - Alternate image to be used for views.
- Summary - Short description of content and should be 300 character or less. The summary is used for views and search engine results to help users determine the relevance of the content to their needs.
Ability to categorize content through the use of terms.
Taxonomy Terms can be added two ways depending on how the editor wishes to build out the content.
- If the terms to be used are already known, terms can be created and managed following the Add Taxonomy Term guide.
- Otherwise terms can be created on the fly by typing them in the field on your content. This will auto-create the term to be used.
- Be aware though, that capitalization and spelling mistakes can create new terms. Please double check what you type before saving to avoid many different terms.
Categories allow filtering of content based on different category taxonomy terms. This is available for the Article, Facility Hours, Profile, and Spotlight content types.
- Expand the Taxonomy section
- Start typing the term in the Categories field. This is autocomplete so you will be able to select the term from the list of terms available.
- Click Add another item to add additional terms
Content Order works like the weight on a menu, allowing you to set the order of the content when it displays to the user. This is available for the Profile and Spotlight content types.
Use the dropdown to select the order in which the content should be displayed.
- Content with lower numbers appears first.
- Content with higher numbers appear last.
- When two pieces of content have the same Weight / Order the sorting will be alphabetical.

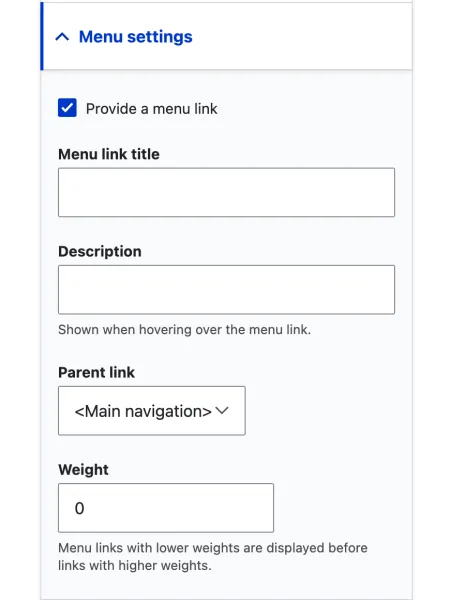
When you are editing content, you can access the menu settings for that content by clicking on the Menu settings tab in the content editor. Then select the Provide a menu link checkbox to display more available options.
The menu settings allow you to control the appearance and behavior of the content in the site's menus. There are several options available in the menu settings, including:
- Menu link title - This field allows you to specify the text that will appear in the menu for the content. If left blank, the title of the content will be used.
- Parent item - This drop-down menu allows you to specify the parent menu item for the content. This determines the hierarchy of the menu and the location of the content in the menu.
- Weight - This field allows you to specific the weight of the content in the menu. Higher weights will cause the content to appear lower in the menu, while lower weights will cause the content to appear higher in the menu.
- Provide a menu link - This checkbox allows you to specific whether or not the content should be included in the site's menus. If checked, the content will appear in the menus; if unchecked, it will not.
By configuring the menu settings while editing content, you can control the appearance and behavior of the content in the site's menus.

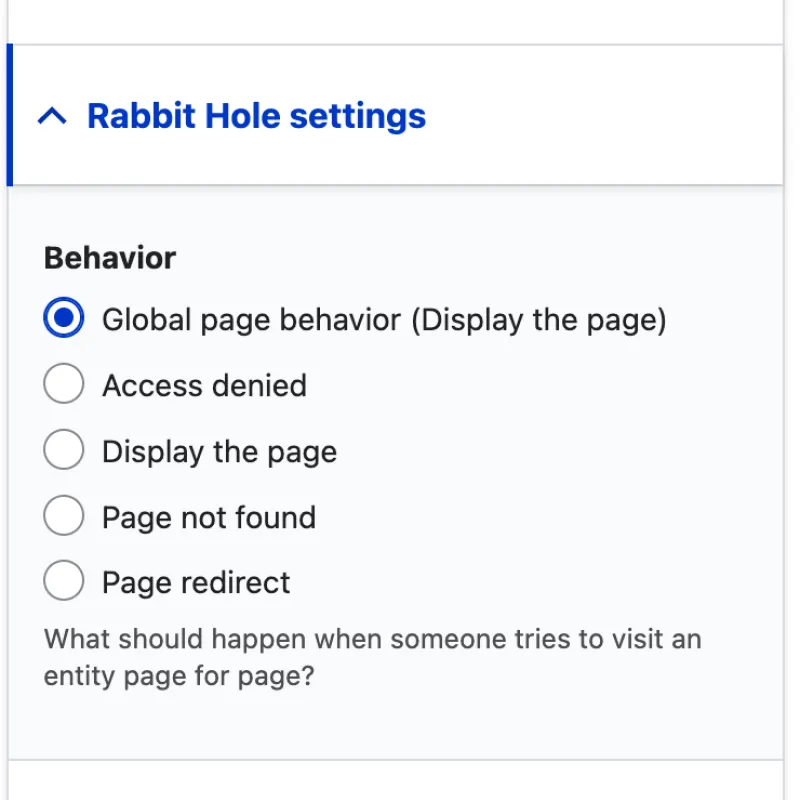
The Rabbit Hole settings allow you to control the behavior of content when it is accessed directly through its URL. You can access the rabbit hole settings for a piece of content by clicking on the Rabbit Hole tab in the content editor.
There are several options available in the rabbit hole settings, including:
- Access denied - This option allows you to specify a custom page to be displayed when the user does not have permission to access the content.
- Display the page - This option allows the page to be displayed as normal to all users. This is the default behavior for all content.
- Page not found - The option allows you to specify a custom page to be displayed when the content is accessed through its URL, but access to the content is disallowed.
- Page redirect - This option allows you to prevent the content from being accessed directly through its URL. If selected, the content will not be displayed and the user will be redirect to a specified page.
By configuring rabbit hole setting when editing content, you can control the behavior of the content when it is being accessed directly through its URL. This can be useful for content that should only be accessible through the site's menus or for content that should only be accessible to certain users.

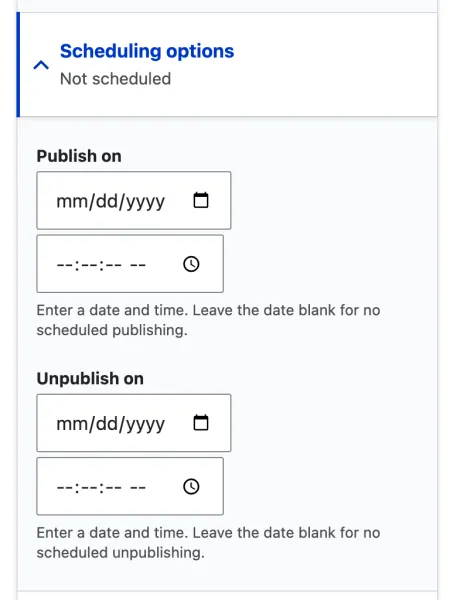
Scheduling options allows you to control the publishing status and date for a piece of content. You can access the scheduling options by clicking on the Scheduling options tab in the content editor.
There are several options available in scheduling options, including:
- Publish on - This field allows you to specify a date and time for the content to automatically be published.
- Unpublish on - This field allows you to specify a date and time for the content to automatically be unpublished.
By configuring the scheduling options when editing content, you can control the schedule of the publishing and unpublishing of the content at specific dates and times.

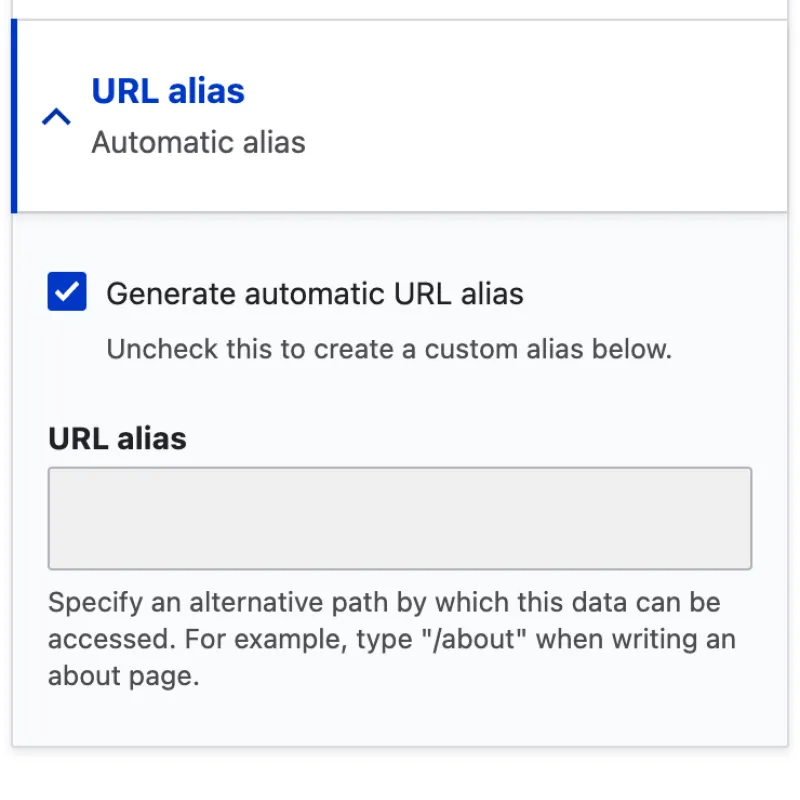
To change the URL alias for a single piece of content, you can edit the URL alias field in the content editor. The URL alias field is usually located in the URL alias tab of the content editor.
Simply unselect the checkbox for Generate automatic URL alias and enter the new URL in the URL alias field, then click the Save button. The URL alias for the content will be updated to the new value.
Note:
- Changing the URL alias for a piece of content will create a redirect from the old URL alias to the new URL alias. This is to ensure that users and search engines can still acces to the content event if the URL alias has changed.

The URL redirects feature allows you to specify a custom URL for a piece of content, which will redirect users to the content when accessed. This can be useful if you want to use a shorter or more memorable URL for the content, or if you want to redirect users from an old URL to a new URL.
To use the URL redirects feature when editing content, follow these steps:
- Click on the URL redirects tab in the content editor.
- Click on Add URL redirect to add additional redirect to the content.
- Enter the custom URL that you want to use for the content in the Redirect from field.
- If desired, select the Redirect status option to specify the type of redirect that should be used. The options include 301 Moved Permanently, 302 Found, and 303 See Other.
- Click the Save button to save your changes.
Note:
- Clicking on Add URL redirect will open a new tab.
- Click on Edit or Delete for the specific redirect will not open a new tab and all changes not saved will be lost.
Now, when users access the custom URL that you specified, they will be automatically redirected to the content. The URL redirects feature can be useful for maintaining the integrity of your site's URLs and for making it easier for users to access your content.